
Spring Cloud Config Server provides remote configuration for your Spring applications or any application running in any language. This tool has been out there for a long time, so it is very mature and reliable. Spring Cloud Config Server comes in handy when you need to set up configurations for microservices in multiple environments, so you can manage properties separately and avoid the hassle of triggering application builds when only the configuration is updated.
Getting Started
By default Spring Cloud Config Server uses git to store the configuration files, however you could write your own implementation and use a different version control system (VCS).
Clients retrieve the configuration through Spring Cloud Config Server and both client and server have to be mapped to the Spring Environment, which contains:
-
{application}isspring.application.nameon the client side. -
{profile}isspring.profiles.activeon the client. -
{label}is the commit id, branch name, or tag.
Property files can be named and located as follows:
 /{application}/{profile}[/{label}]
 /{application}-{profile}.yml
 /{label}/{application}-{profile}.yml
 /{application}-{profile}.properties
 /{label}/{application}-{profile}.properties
Note: Active profiles take precedence over defaults. When multiple profiles are selected, the last one will be chosen.
Note: If the git branch or tag name contains slashes (
/) they must be replaced with underscores (_).
Client Side
The following Maven dependency is required on the config server clients:
<dependency>
    <groupId>org.springframework.cloud</groupId>
    <artifactId>spring-cloud-starter-config</artifactId>
</dependency>
then you only need to set a few Spring properties in bootstrap.yml:
spring:
  application:
    name: first-client
  cloud:
    config:
      uri: http://localhost:8888
  profiles:
    active: development
where the spring.application.name will be mapped to the {application} part of the property file stored in git; spring.cloud.config.uri is the Spring Config Server application address; and spring.profiles.active will be mapped to the {profile} part of the property file. Additionally, you could set spring.cloud.config.label which would be mapped to the commit id, branch name, or tag. For the previous example you should have a property file named first-client-development.yml on your git config repo in order to use the remote configuration.
Note: Remember that
bootstrap.ymlis loaded beforeapplication.yml, and so the first one is needed if your application’s configuration is stored on a remote configuration server and properties need to be decrypted.
Server Side
The Maven dependency required on the server side is:
<dependency>
    <groupId>org.springframework.cloud</groupId>
    <artifactId>spring-cloud-config-server</artifactId>
</dependency>
By simply using the @EnableConfigServer annotation, Spring Cloud Cloud is configured in the Spring Boot application.
@EnableConfigServer
@SpringBootApplication
public class ConfigServerApplication {
    public static void main(String[] args) {
        SpringApplication.run(ConfigServerApplication.class, args);
    }
}
also a couple of properties have to be set on the application property file:
server:
  port: 8888
spring:
  cloud:
    config:
      server:
        git:
          uri: https://github.com/smartinrub/spring-cloud-bus-config-server.git
where server.port is used to run the application in a particular port; and spring.cloud.config.server.git.uri is the git repository URL where the property files are stored.
Note: You could create a git repository on your local machine, commit the changes and set
spring.cloud.config.server.git.urito something likefile://${user.home}/config-repo, so you can test your configuration locally.
Encrypted Properties
Spring Cloud Config Server supports property encryption. You can use either symmetric or asymmetric key encryption. Spring recommends to use a symmetric key since you will only need to configure a single value in the bootstrap property file, however you might want to use asymmetric keys if you want to increase the security.
You can encrypt and decrypt properties with /encrypt and /decrypt endpoints, or use the Spring CLI tool with the Spring Cloud plugin.
For instance, you can encrypt a property like this:
curl localhost:8888/encrypt -d mysecret
and to decrypt it like this:
curl localhost:8888/decrypt -d 682bc583f4641835fa2db009355293665d2647dade3375c0ee201de2a49f7bda
Note: Encrypted vales require the prefix
{cipher}when you put them inapplication.properties(or.yml).
Symmetric
encrypt:
  key: ${ENCRYPT_KEY} ## any string
To configure a symmetric key, you need to set encrypt.key to a plain text string in Spring Cloud Config Server (the client does not require this key since values are decrypted automatically before they are sent to the client) and set the ENCRYPT_KEY environment variable to keep it out of plain-text repository files. For example, you can pass it using Jenkins while running your pipeline.
Important: Automatic decryption is not working for 2.2.0.M3 when headers contain
application/vnd.spring-cloud.config-server.v2+json, sinceincludeOriginis set to true. This is happening because the property source now contains aPropertyValueDescriptorinstead of a string value, sotoString()method returns the object address. In the meantime you are force to decrypt the values in the client by setting theencrypt.keyproperty.
Note:
ENCRYPT_KEYoverridesencrypt.keyvalue.
You can also disable decryption of properties before sending them to the client. To do this you have to set spring.cloud.config.server.encrypt.enabled to false (true is the default value). When this property is set to false, encrypt.key is required on the client side for decryption during start up.
Asymmetric
The asymmetric key is superior in terms of security, but it is usually less convenient since you have to set a few properties.
A keystore is needed to set up an asymmetric key. This requires a password which itself would have to be stored unencrypted and then set the keystore password as an environment variable.
keytool -genkeypair -alias myKeyStore -keyalg RSA \
  -dname "CN=Web Server,OU=Unit,O=Organization,L=City,S=State,C=US" \
  -keystore server.jks -storepass password123
Finally, set the keystore configuration in the Spring Cloud Config Server:
encrypt:
  key-store:
    location: classpath:keys/server.jks
    password: ${ENCRYPT_KEY}
    alias: myKeyStore
Note: If a property cannot be decrypted the value will be replaced with
<n/a>.
Dynamic Configuration Changes
Another important feature of Spring Cloud Config Server is the possibility of refreshing the client configuration at runtime without restarting the JVM. By default, configuration values are read on the client’s startup. To take advantage of this feature you need to enable the /refresh endpoint. To do so, go to your client application properties file and include the endpoint:
management:
  endpoints:
    web:
      exposure:
        include: refresh
Note:
spring-boot-starter-actuatordependency is required in order to activate management endpoints.
Once the endpoint is enabled on the client you can hit the /refresh endpoint:
curl -X POST localhost:8080/actuator/refresh
Note: What’s happening under the hood? The
ContextRefresherclass is called, then it iterates through all the property sources and searches for changes, publishes an event to signal a change in the environment and finally it destroys the current instance of all beans in this scope and forces a refresh on the next method execution.
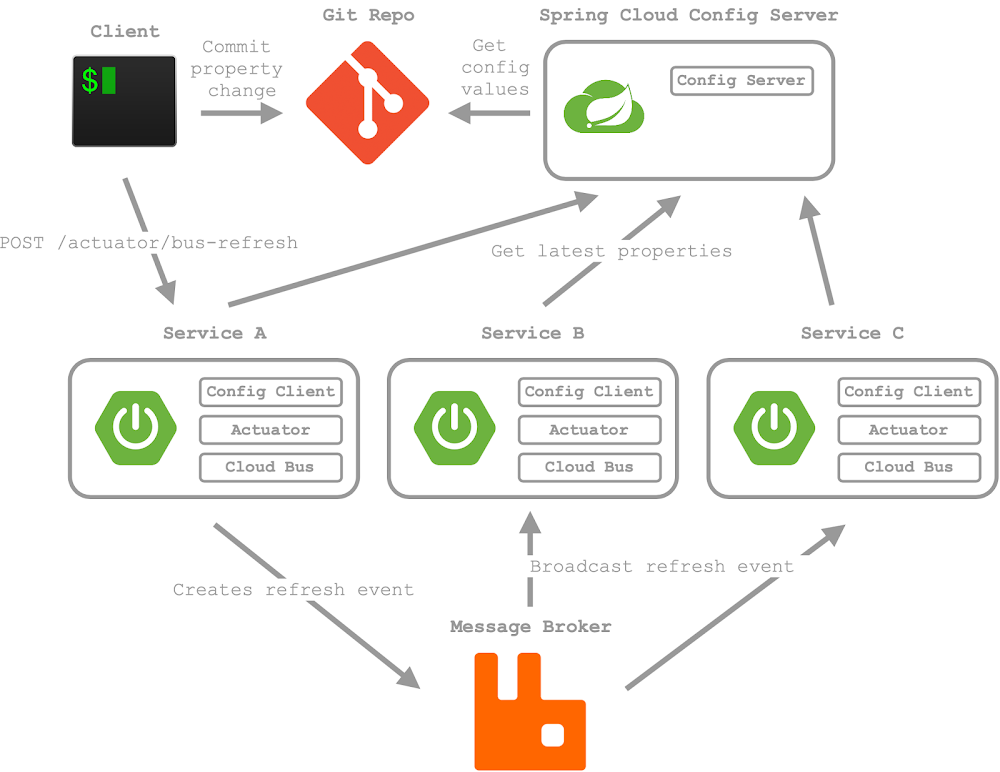
As you can see this is a very nice feature, however it is not very convenient out-of-the-box, because once you start having many services running refreshing on each one will become a hassle, that is why Spring provides a practical way to trigger the refresh event for all related services when property change, and this can be achieved with Spring Cloud Bus. How does it work? When the refresh event of one of the services is triggered, this event is automatically broadcasted through all the other services by using a message broker, and this can be translated as a distributed Actuator.
Spring Cloud Bus uses a message broker, and you can choose between RabbitMQ or Kafka. In case of RabbitQM you can run it with Docker as follows:
docker run -d --hostname my-rabbit --name some-rabbit -p 15672:15672 -p 5672:5672 rabbitmq:3-management
and add the following dependency to all the client services:
<dependency>
    <groupId>org.springframework.cloud</groupId>
    <artifactId>spring-cloud-starter-bus-amqp</artifactId>
</dependency>
In order to enable /actuator/bus-refresh you have to add another exclusion in the services consuming the properties:
management:
  endpoints:
    web:
      exposure:
        include: refresh, bus-refresh
Now if you hit the endpoint /actuator/bus-refresh of one of your services:
curl -X POST localhost:{server-port}/actuator/bus-refresh
the selected service will publish a refresh event in the chosen message broker and will broadcast it across all the connected services.
The broker message configuration can be shared by creating a application.yml or application.properties to the root of your configuration repo and adding the connection properties to it.
Note: Any property that is added in to the
application.properties(or.yml) in the root of your configuration repository is shared among all services. This is very useful when you want to share common configuration (like database addresses) across applications.
What’s next?
You can go a step further by automating the task of hitting the bus refresh endpoint. Many source code repositories like GitHub, Gitlab or Bitbucket notify you of changes in a repository through a web-hook. The web-hook can be configured to listen to changes on your config repo and broadcast the refresh event to every connected service with Spring Cloud Bus.

A couple of dependencies in the Spring Cloud Config server are needed to make this work:
<dependency>
  <groupId>org.springframework.cloud</groupId>
  <artifactId>spring-cloud-starter-stream-rabbit</artifactId>
</dependency>

<dependency>
  <groupId>org.springframework.cloud</groupId>
  <artifactId>spring-cloud-config-monitor</artifactId>
</dependency>
and set to true spring.cloud.bus.enabled property in application.yml (or .properties). Finally, you have to set up a web-hook on Github as follows:


To try this out you can either make the Spring Cloud Config Server application public or you can simulate a git push notification request.
curl -X POST "http://localhost:8888/monitor"
-H 'X-GitHub-Event: push'
-H "Content-Type: application/json"
-d '{
    "commits": [
        {
            "modified": [
                "application.yml"
            ]
        }
    ]
}'
Note: To make your application public you could set up you router with a port forwarding rule.
The config server application will create a refresh event in the message broker and based on the application name used for the property file name, it will send the refresh event to the services that need to be refreshed.
Other Features
- Set multiple repositories with
spring.cloud.config.server.git.repo. - Set the timeout for retrieving properties from git with
spring.cloud.config.server.git.timeout(default value is 5 seconds). - Force the pull from git if you set
spring.cloud.config.server.git.force-pullto true.